How to Set Up Your New iPhone: A Complete Beginner’s Guide
Getting a new iPhone is always exciting, but before you can enjoy all its powerful features, you need to set it up properly. Thankfully, Apple has made the setup process simple, whether you’re upgrading from another iPhone or starting fresh.
In this guide, we’ll walk you through the essential steps to set up your iPhone, from Quick Start and data transfer to Face ID, Apple ID, and iCloud.
Quick Start: The Easiest Way to Set Up Your iPhone

When you first turn on your iPhone, you’ll see the “Quick Start” screen.
- If you have another iPhone or iPad nearby, simply bring it close to your new device.
- You’ll get an option to transfer your settings, Apple ID, and preferences instantly.
- Don’t have another device? You can also set up your iPhone manually.
This saves time and ensures all your important details move seamlessly to your new iPhone.
Transfer Apps and Data from Your Old iPhone
Apple makes it easy to bring over your apps, settings, and content:
- Place both devices side by side.
- Follow the on-screen instructions to wirelessly transfer data.
- Alternatively, you can restore from an iCloud backup or use a computer with iTunes/Finder.
This means you don’t have to manually download apps or set everything up from scratch.
Connect to Wi-Fi and Mobile Service
Your iPhone needs internet access to complete the setup:
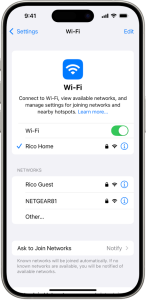
- Wi-Fi Setup:
- Go to Settings > Wi-Fi
- Turn Wi-Fi ON and select your home network.
- Your iPhone will automatically reconnect to this network in the future.
- Mobile Service Setup:
- Depending on your model, insert a physical SIM card or activate an eSIM provided by your carrier.
- Check your connection in Settings > Mobile Service.
Sign in with Your Apple ID
Your Apple ID is the key to unlocking the Apple ecosystem, including:
- App Store & iTunes
- iCloud storage
- FaceTime & iMessage
- Apple Music, Books, and more
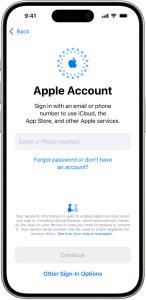
To sign in:
- Go to Settings > Apple ID
- Enter your Apple ID and password
- If you have another Apple device on iOS 17 or iPadOS 17, you can sign in just by bringing your devices close together.
Once signed in, you’ll see your name under Settings > [Your Name].
Set Up Face ID or Touch ID

Apple offers secure biometric authentication to unlock your iPhone, log into apps, and make purchases.
- Face ID (for newer models):
- Go to Settings > Face ID & Passcode
- Tap “Set Up Face ID” and follow the instructions.
- Touch ID (for older models with a home button):
- Go to Settings > Touch ID & Passcode
- Tap “Add a Fingerprint” and follow the instructions.
Your biometric data stays on your device and is never uploaded elsewhere.
Enable “Find My iPhone” for Security

Losing an iPhone is stressful, but Apple’s Find My iPhone feature gives you peace of mind:
- Go to Settings > [Your Name] > Find My
- Tap Find My iPhone and turn it ON.
This allows you to:
- Track your iPhone on the Find My app
- Log in to iCloud.com to locate your device if it’s lost or stolen
Set Up iCloud for Backup and Storage

iCloud keeps your data safe and synced across all your Apple devices. With iCloud, you can:
- Back up your photos, videos, and apps automatically
- Access files from iCloud Drive
- Sync Mail, Contacts, Notes, and Reminders
To check your iCloud settings:
- Go to Settings > [Your Name] > iCloud
- Toggle ON the apps and features you want to sync
Setting up your iPhone might feel overwhelming at first, but with Apple’s Quick Start, secure login, and built-in tools, the process is simple and smooth.
By following these steps, you’ll not only get your iPhone up and running in minutes, but also keep your data secure, your apps organized, and your device ready for everyday use.
